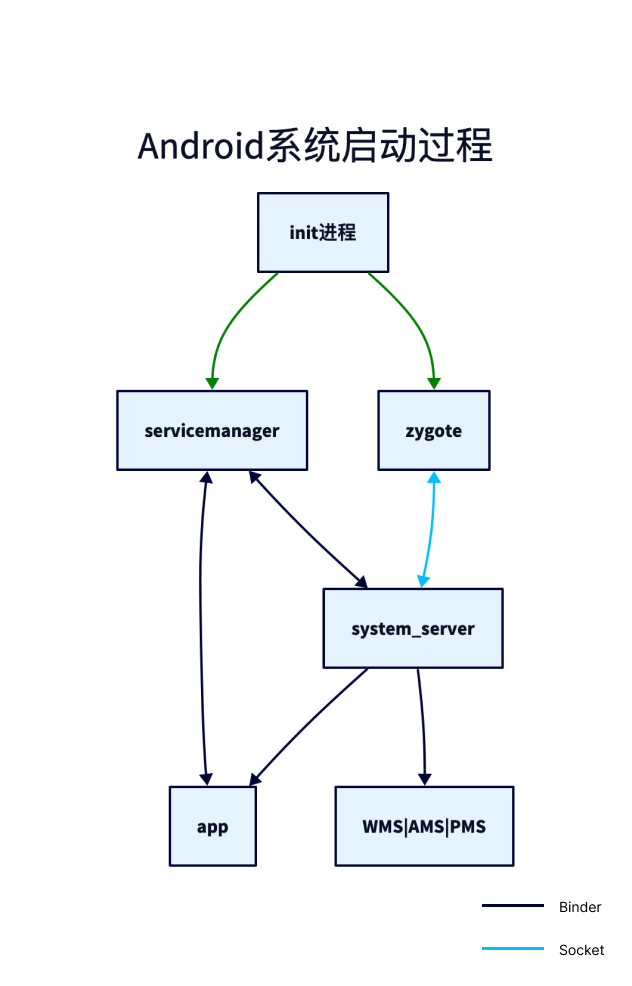
Android 手机从长按开机到应用的启动阶段都经历了些什么呢?Android 启动过程涉及一系列操作,首先是启动 ROM,接着是引导加载程序、内核启动、init、Zygote 和 SystemServer 创建等过程。整个过程涉及到虚拟机的启动、Binder 线程池的创建以及各项系统服务启动等过程。熟悉 APP 启动过程还可以帮助我们打破性能优化瓶颈,助力于启动性能的提升。下面是启动过程涉及到的关键进程和服务:
本文基于 Android 13 最新代码来分析 Android 系统及应用启动过程。
Init 进程启动
init 进程在 Android 系统中扮演着非常重要的角色,它不仅仅是系统的第一个用户进程(pid 为 1),还负责整个系统的启动和进程的管理。当 Android 设备启动时,Bootloader 会初始化硬件设备,并在硬件自检之后将控制权交给 Kernel,Kernel 会加载 Android 系统的内核。而 init 进程的启动过程就发生在内核启动后,接着调用 system/core/init/main.cpp 来创建 init 进程,在此期间读取 init.rc 文件,启动 zygote 进程、servicemanager 等,最后完成初始化工作。下面来结合源码具体分析 init 启动后都做了些什么:
system/core/init/main.cpp
1
2
3
4
5
6
7
8
9
10
11
12
13
14
15
16
17
18
19
20
21
22
23
24
25
26
27
28
29
30
31
32
33
34

using namespace android::init;

int main(int argc, char** argv) {
#if __has_feature(address_sanitizer)
    __asan_set_error_report_callback(AsanReportCallback);
#elif __has_feature(hwaddress_sanitizer)
    __hwasan_set_error_report_callback(AsanReportCallback);
#endif
    // Boost prio which will be restored later
    setpriority(PRIO_PROCESS, 0, -20);
    if (!strcmp(basename(argv[0]), "ueventd")) {
        return ueventd_main(argc, argv);
    }

    if (argc > 1) {
        if (!strcmp(argv[1], "subcontext")) {
            android::base::InitLogging(argv, &android::base::KernelLogger);
            const BuiltinFunctionMap& function_map = GetBuiltinFunctionMap();

            return SubcontextMain(argc, argv, &function_map);
        }

        if (!strcmp(argv[1], "selinux_setup")) {
            return SetupSelinux(argv);
        }

        if (!strcmp(argv[1], "second_stage")) {
            return SecondStageMain(argc, argv);
        }
    }

    return FirstStageMain(argc, argv);
}
内核启动后会调用到这里的 main 函数,主要执行了以下几个操作:
- ueventd_main:该函数是 ueventd 守护进程的主要函数,通过 netlink scoket 响应内核生成的 uevent 事件。它设置信号处理程序,创建用于侦听传入 uevent 的套接字,然后进入无限循环以处理 uevent 事件。 它其实也算是 init 进程,不过具体细节本文不再深究,后面会单独拎出来讲一讲。
- SubcontextMain:subcontext 进程的主要处理函数,负责为 init 进程创建和管理子进程,并通过 socket 与 init 进行通信。
- SetupSelinux:该函数会尝试加载在init.rc文件中定义的SELinux策略文件。如果文件存在,则在系统启动时加载所需的SELinux策略,并执行其他相关的SELinux设置。这些设置包括设置SELinux上下文,为设备中的所有进程和授权的服务分配安全策略和权限等。
- FirstStageMain:init 执行的第一阶段,主要做一些初始化文件系统、kernel 日志以及为第二阶段设定一些环境变量。
- SecondStageMain:init 执行的第二阶段,主要负责加载属性文件、启动属性服务、加载 init.rc 文件并创建和启动子进程。
下面我们着重分析一下 init.rc 加载及子进程启动过程。
1
2
3
4
5
6
7
8
9
10
11
12
13
14
15
16
17
18
19
20
int SecondStageMain(int argc, char** argv) {
    if (REBOOT_BOOTLOADER_ON_PANIC) {
        InstallRebootSignalHandlers();
    }
   	......
    // 加载属性文件
    PropertyInit();
  	......
    // 启动属性服务
    StartPropertyService(&property_fd);

    // Make the time that init stages started available for bootstat to log.
    RecordStageBoottimes(start_time);

   	......
    ActionManager& am = ActionManager::GetInstance();
    ServiceList& sm = ServiceList::GetInstance();
		// 加载解析 init.rc
    LoadBootScripts(am, sm);
}
init.rc 文件的解析是在 LoadBootScripts() 中完成的,详见下面的实现:
1
2
3
4
5
6
7
8
9
10
11
12
13
14
15
16
17
18
19
20
21
22
23
24
25
static void LoadBootScripts(ActionManager& action_manager, ServiceList& service_list) {
    Parser parser = CreateParser(action_manager, service_list);

    std::string bootscript = GetProperty("ro.boot.init_rc", "");
    if (bootscript.empty()) {
        parser.ParseConfig("/system/etc/init/hw/init.rc");
        if (!parser.ParseConfig("/system/etc/init")) {
            late_import_paths.emplace_back("/system/etc/init");
        }
        // late_import is available only in Q and earlier release. As we don't
        // have system_ext in those versions, skip late_import for system_ext.
        parser.ParseConfig("/system_ext/etc/init");
        if (!parser.ParseConfig("/vendor/etc/init")) {
            late_import_paths.emplace_back("/vendor/etc/init");
        }
        if (!parser.ParseConfig("/odm/etc/init")) {
            late_import_paths.emplace_back("/odm/etc/init");
        }
        if (!parser.ParseConfig("/product/etc/init")) {
            late_import_paths.emplace_back("/product/etc/init");
        }
    } else {
        parser.ParseConfig(bootscript);
    }
}
Init 进程依次解析不同路径下谷歌内置 system、SoC 厂商 vendor 以及 odm 厂商的 init.rc 文件并执行启动相关进程。init.rc 本质上只是一个语法文件,至于具体的 Service 和 Action 解析逻辑是在 ServiceParser 和 ActionParser 中处理,至于最终执行逻辑则是由解析处理器将所有 Service 和 Action 封装到 ServiceList 和 ActionList 单例对象中集中处理的。这里以 init.zygote64_32.rc 中一段启动 zygote 的 rc 代码为例:
Note:system/core/rootdir/init.rc 中通过 import 动态引入了基于不同平台的 zygote 进程启动配置,以下仅以常见的 init.zygote64_32.rc 平台为例。
		service zygote /system/bin/app_process64 -Xzygote /system/bin --zygote --start-system-server --socket-		name=zygote
    class main
    priority -20
    user root
    group root readproc reserved_disk
    socket zygote stream 660 root system
    socket usap_pool_primary stream 660 root system
    onrestart exec_background - system system -- /system/bin/vdc volume abort_fuse
    onrestart write /sys/power/state on
    onrestart restart audioserver
    onrestart restart cameraserver
    onrestart restart media
    onrestart restart media.tuner
    onrestart restart netd
    onrestart restart wificond
    task_profiles ProcessCapacityHigh MaxPerformance
    critical window=${zygote.critical_window.minute:-off} target=zygote-fatal
Service 是一个服务类型的程序,以 service 开头,由 init 进程启动,其中每一个 service ,在启动时会通过 fork 方式生成子进程。其中,zygote 是进程的名字,/system/bin/app_process 是执行程序的路径,它是通过编译生成的,其包含了 main() 函数在内的一系列代码。在编译过程中,编译器会将源代码编译成目标文件,并将目标文件链接成可执行文件。在链接过程中,编译器会将不同的目标文件链接到一起,形成一个统一的可执行文件。在这个过程中, app_process 可执行文件会链接到 app_main.cpp 文件中定义的 main() 函数,因此运行 app_process 可执行文件时,系统会自动调用 app_main.cpp 文件中的 main() 函数。
后面几项则是传递给执行程序的参数,其中 --start-system-server 表示在 Zygote 进程启动后需要启动 System Server 进程。Zygote 进程是使用 Socket 来进行跨进程通信的,所以会创建一个名为 zygote 的 socket,660 表示访问权限 rw-rw----,表示文件拥有者和同一群组用户具有读写权限。
了解更多关于 init.rc 语法约定参考:Android启动初始化 init.rc 详解
接着 zygote 进程通过以下代码被启动:
system/core/init/service.cpp
1
2
3
4
5
6
7
8
9
10
11
12
13
14
15
16
17
18
19
20
21
22
23
24
25
26
27
Result<void> Service::Start() {
		...

    pid_t pid = -1;
    if (namespaces_.flags) {
        pid = clone(nullptr, nullptr, namespaces_.flags | SIGCHLD, nullptr);
    } else {
        pid = fork();
    }

    if (pid == 0) {
        umask(077);
        cgroups_activated.CloseWriteFd();
        setsid_finished.CloseReadFd();
        RunService(descriptors, std::move(cgroups_activated), std::move(setsid_finished));
        _exit(127);
    } else {
        cgroups_activated.CloseReadFd();
        setsid_finished.CloseWriteFd();
    }

    if (pid < 0) {
        pid_ = 0;
        return ErrnoError() << "Failed to fork";
    }
  	...
}
可以看到最终是通过 clone 或者 fork 的方式来创建一个进程,并返回 pid,其实最终它们都是通过系统调用基于父进程孵化出一个子进程,并与当前进程共享地址空间和文件描述符等资源。
zygote 进程
通过上面分析我们知道,zygote 进程在启动后会执行到 app_main.cpp 的 main 函数中:
frameworks/base/cmds/app_process/app_main.cpp
1
2
3
4
5
6
7
8
9
10
11
12
13
14
15
16
17
18
19
20
21
22
23
24
25
26
27
28
29
30
31
32
33
34
35
36
37
38
39
40
41
42
43
44
45
46
47
48
49
50
51
52
53
54
55
56
57
#if defined(__LP64__)
static const char ABI_LIST_PROPERTY[] = "ro.product.cpu.abilist64";
static const char ZYGOTE_NICE_NAME[] = "zygote64";
#else
static const char ABI_LIST_PROPERTY[] = "ro.product.cpu.abilist32";
static const char ZYGOTE_NICE_NAME[] = "zygote";
#endif

int main(int argc, char* const argv[])
{
    AppRuntime runtime(argv[0], computeArgBlockSize(argc, argv));
    ...
    // Parse runtime arguments.  Stop at first unrecognized option.
    bool zygote = false;
    bool startSystemServer = false;
    bool application = false;
    String8 niceName;
    String8 className;

    ++i;  // Skip unused "parent dir" argument.
    while (i < argc) {
        const char* arg = argv[i++];
      	// 通过 init.rc 中约定的 `--zygote` 来判断是zygote进程
        if (strcmp(arg, "--zygote") == 0) {
            zygote = true;
            niceName = ZYGOTE_NICE_NAME;
        } else if (strcmp(arg, "--start-system-server") == 0) {
            startSystemServer = true;
        } else if (strcmp(arg, "--application") == 0) {
            application = true;
        } else if (strncmp(arg, "--nice-name=", 12) == 0) {
            niceName.setTo(arg + 12);
        } else if (strncmp(arg, "--", 2) != 0) {
            className.setTo(arg);
            break;
        } else {
            --i;
            break;
        }
    }

    ...
    if (!niceName.isEmpty()) {
        runtime.setArgv0(niceName.string(), true /* setProcName */);
    }

    if (zygote) {
      	// 进入 AppRunTime 中继续执行,准备穿越到 Java 世界
        runtime.start("com.android.internal.os.ZygoteInit", args, zygote);
    } else if (className) {
        runtime.start("com.android.internal.os.RuntimeInit", args, zygote);
    } else {
        fprintf(stderr, "Error: no class name or --zygote supplied.\n");
        app_usage();
        LOG_ALWAYS_FATAL("app_process: no class name or --zygote supplied.");
    }
}
通过上述代码我们可以发现,zygote 进程通过 --zygote 参数标记,如果是 zygote 进程,最终会执行到 AppRuntime.start 中:
frameworks/base/core/jni/AndroidRuntime.cpp
1
2
3
4
5
6
7
8
9
10
11
12
13
14
15
16
17
18
19
20
21
22
23
24
25
26
27
28
29
30
31
32
33
34
35
36
37
38
39
40
41
42
43
44
45
46
47
48
49
50
51
52
53
54
55
56
57
58
59
60
61
62
63
64
65
66
67
68
69
70
/*
 * Start the Android runtime.  This involves starting the virtual machine
 * and calling the "static void main(String[] args)" method in the class
 * named by "className".
 *
 * Passes the main function two arguments, the class name and the specified
 * options string.
 */
void AndroidRuntime::start(const char* className, const Vector<String8>& options, bool zygote)
{
    ALOGD(">>>>>> START %s uid %d <<<<<<\n",
            className != NULL ? className : "(unknown)", getuid());

    static const String8 startSystemServer("start-system-server");
    // Whether this is the primary zygote, meaning the zygote which will fork system server.
    bool primary_zygote = false;

    ...

    /* start the virtual machine */
    JniInvocation jni_invocation;
    jni_invocation.Init(NULL);
    JNIEnv* env;
    if (startVm(&mJavaVM, &env, zygote, primary_zygote) != 0) {
        return;
    }
    onVmCreated(env);

    /*
     * Register android functions.
     */
    if (startReg(env) < 0) {
        ALOGE("Unable to register all android natives\n");
        return;
    }

    ...

    /*
     * Start VM.  This thread becomes the main thread of the VM, and will
     * not return until the VM exits.
     */
    char* slashClassName = toSlashClassName(className != NULL ? className : "");
    jclass startClass = env->FindClass(slashClassName);
    if (startClass == NULL) {
        ALOGE("JavaVM unable to locate class '%s'\n", slashClassName);
        /* keep going */
    } else {
        jmethodID startMeth = env->GetStaticMethodID(startClass, "main",
            "([Ljava/lang/String;)V");
        if (startMeth == NULL) {
            ALOGE("JavaVM unable to find main() in '%s'\n", className);
            /* keep going */
        } else {
            env->CallStaticVoidMethod(startClass, startMeth, strArray);

#if 0
            if (env->ExceptionCheck())
                threadExitUncaughtException(env);
#endif
        }
    }
    free(slashClassName);

    ALOGD("Shutting down VM\n");
    if (mJavaVM->DetachCurrentThread() != JNI_OK)
        ALOGW("Warning: unable to detach main thread\n");
    if (mJavaVM->DestroyJavaVM() != 0)
        ALOGW("Warning: VM did not shut down cleanly\n");
}
通过这部分代码我们了解到,jni 层的 AndroidRuntime 的 start 函数主要完成了三件事:
- 启动 zygote 进程的虚拟机
- 完成 JNI 方法注册(在 VM 上注册 Android 本地方法,只为了能够让 native 调用到 Java 层方法)
- 调用 Java 层的 com.android.internal.os.ZygoteInit#main 方法
至此,终于来到了我们熟悉的 Java 世界了,继续 zygote 的初始化逻辑:
com.android.internal.os.ZygoteInit
1
2
3
4
5
6
7
8
9
10
11
12
13
14
15
16
17
18
19
20
21
22
23
24
25
26
27
28
29
30
31
32
33
34
35
36
37
38
39
40
41
42
43
44
45
46
47
48
49
50
51
52
53
54
55
56
57
58
59
60
61
62
63
64
65
66
67
68
69
70
71
72
73
74
75
/**
     * This is the entry point for a Zygote process.  It creates the Zygote server, loads resources,
     * and handles other tasks related to preparing the process for forking into applications.
     *
     * This process is started with a nice value of -20 (highest priority).  All paths that flow
     * into new processes are required to either set the priority to the default value or terminate
     * before executing any non-system code.  The native side of this occurs in SpecializeCommon,
     * while the Java Language priority is changed in ZygoteInit.handleSystemServerProcess,
     * ZygoteConnection.handleChildProc, and Zygote.childMain.
     *
     * @param argv  Command line arguments used to specify the Zygote's configuration.
     */
    @UnsupportedAppUsage
    public static void main(String[] argv) {
        ZygoteServer zygoteServer = null;

        Runnable caller;
        try {
           	...
            boolean startSystemServer = false;
            String zygoteSocketName = "zygote";
            boolean enableLazyPreload = false;
            for (int i = 1; i < argv.length; i++) {
                if ("start-system-server".equals(argv[i])) {
                    startSystemServer = true;
                } else if ("--enable-lazy-preload".equals(argv[i])) {
                    enableLazyPreload = true;
                } else if (argv[i].startsWith(ABI_LIST_ARG)) {
                    abiList = argv[i].substring(ABI_LIST_ARG.length());
                } else if (argv[i].startsWith(SOCKET_NAME_ARG)) {
                    zygoteSocketName = argv[i].substring(SOCKET_NAME_ARG.length());
                } else {
                    throw new RuntimeException("Unknown command line argument: " + argv[i]);
                }
            }

            // In some configurations, we avoid preloading resources and classes eagerly.
            // In such cases, we will preload things prior to our first fork.
            if (!enableLazyPreload) {
                preload(bootTimingsTraceLog);
            }

            zygoteServer = new ZygoteServer(isPrimaryZygote);

            if (startSystemServer) {
                Runnable r = forkSystemServer(abiList, zygoteSocketName, zygoteServer);

                // {@code r == null} in the parent (zygote) process, and {@code r != null} in the
                // child (system_server) process.
                if (r != null) {
                    r.run();
                    return;
                }
            }

            Log.i(TAG, "Accepting command socket connections");

            // The select loop returns early in the child process after a fork and
            // loops forever in the zygote.
            caller = zygoteServer.runSelectLoop(abiList);
        } catch (Throwable ex) {
            Log.e(TAG, "System zygote died with fatal exception", ex);
            throw ex;
        } finally {
            if (zygoteServer != null) {
                zygoteServer.closeServerSocket();
            }
        }

        // We're in the child process and have exited the select loop. Proceed to execute the
        // command.
        if (caller != null) {
            caller.run();
        }
    }
ZygoteInit#main 中大致做了以下几件事:
- preload:预加载系统基础类、资源文件、共享库等。
- ZygoteServer:创建 Socket 服务端,用于和其他进程通信。
- forkSystemServer:fork 出 system_server 子进程,下面会分析到。
- ZygoteServer#runSelectLoop:socket 循环监听 AMS 用于创建应用进程的请求。
那么我简单总结一下,zygote 进程负责创建虚拟机,并注册 JNI 方法,成为 Java 进程的母体,用于持续孵化 Java 进程。在创建完system_server 进程后调用 runSelectLoop,随时等待接收创建新进程的请求并立即唤醒开始执行相应创建工作。
system_server 进程
Zygote 的初始化过程涉及到 system_server 进程的创建和启动,那我们就来看下 system_server 进程的启动过程:
com.android.internal.os.ZygoteInit
1
2
3
4
5
6
7
8
9
10
11
12
13
14
15
16
17
18
19
20
21
22
23
24
25
26
27
28
29
30
31
32
33
34
35
36
37
38
39
40
41
42
43
44
45
46
47
48
49
50
51
52
53
54
55
56
57
58
59
60
61
62
63
64
65
66
67
68
69
70
71
72
73
74
75
76
77
78
79
80
81
82
83
84
85
86
87
88
89
90
91
92
93
94
95
/**
     * Prepare the arguments and forks for the system server process.
     *
     * @return A {@code Runnable} that provides an entrypoint into system_server code in the child
     * process; {@code null} in the parent.
     */
    private static Runnable forkSystemServer(String abiList, String socketName,
            ZygoteServer zygoteServer) {
      String[] args = {
                "--setuid=1000",
                "--setgid=1000",
                "--setgroups=1001,1002,1003,1004,1005,1006,1007,1008,1009,1010,1018,1021,1023,"
                        + "1024,1032,1065,3001,3002,3003,3006,3007,3009,3010,3011",
                "--capabilities=" + capabilities + "," + capabilities,
                "--nice-name=system_server",
                "--runtime-args",
                "--target-sdk-version=" + VMRuntime.SDK_VERSION_CUR_DEVELOPMENT,
                // system_server 执行程序的类名
                "com.android.server.SystemServer",
        };
        ...
        ZygoteArguments parsedArgs;

        int pid;

        try {
            ...
            /* Request to fork the system server process */
            pid = Zygote.forkSystemServer(
                    parsedArgs.mUid, parsedArgs.mGid,
                    parsedArgs.mGids,
                    parsedArgs.mRuntimeFlags,
                    null,
                    parsedArgs.mPermittedCapabilities,
                    parsedArgs.mEffectiveCapabilities);
        } catch (IllegalArgumentException ex) {
            throw new RuntimeException(ex);
        }

        /* For child process */
        if (pid == 0) {
            if (hasSecondZygote(abiList)) {
                waitForSecondaryZygote(socketName);
            }

            zygoteServer.closeServerSocket();
            return handleSystemServerProcess(parsedArgs);
        }

        return null;
    }

/**
     * Finish remaining work for the newly forked system server process.
     */
    private static Runnable handleSystemServerProcess(ZygoteArguments parsedArgs) {
      	if (parsedArgs.mNiceName != null) {
            Process.setArgV0(parsedArgs.mNiceName);
        }
        ...
        if (parsedArgs.mInvokeWith != null) {
            ...
            throw new IllegalStateException("Unexpected return from WrapperInit.execApplication");
        } else {
            ClassLoader cl = getOrCreateSystemServerClassLoader();
            if (cl != null) {
                Thread.currentThread().setContextClassLoader(cl);
            }

            /*
             * Pass the remaining arguments to SystemServer.
             */
            return ZygoteInit.zygoteInit(parsedArgs.mTargetSdkVersion,
                    parsedArgs.mDisabledCompatChanges,
                    parsedArgs.mRemainingArgs, cl);
        }

        /* should never reach here */
    }

		public static Runnable zygoteInit(int targetSdkVersion, long[] disabledCompatChanges,
            String[] argv, ClassLoader classLoader) {
        if (RuntimeInit.DEBUG) {
            Slog.d(RuntimeInit.TAG, "RuntimeInit: Starting application from zygote");
        }

        Trace.traceBegin(Trace.TRACE_TAG_ACTIVITY_MANAGER, "ZygoteInit");
        RuntimeInit.redirectLogStreams();
				// 设置异常处理机制
        RuntimeInit.commonInit();
      	// 启动进程的Binder线程池
        ZygoteInit.nativeZygoteInit();
        return RuntimeInit.applicationInit(targetSdkVersion, disabledCompatChanges, argv,
                classLoader);
    }
看到上面的参数信息 args 包含了 com.android.server.SystemServer 就可以大致猜到最后应该是反射创建的实例。上面方法 ZygoteInit#forkSystemServer 继续追踪下去,system_server 进程的创建最终通过 Zygote.forkSystemServer 实现的:
1
2
3
4
5
6
7
8
9
10
11
12
13
14
15
16
17
18
19
20
21
22
23
24
25
26
27
28
29
30
31
32
33
34
35
36
37
/**
     * Special method to start the system server process. In addition to the
     * common actions performed in forkAndSpecialize, the pid of the child
     * process is recorded such that the death of the child process will cause
     * zygote to exit.
     *
     * @param uid the UNIX uid that the new process should setuid() to after
     * fork()ing and and before spawning any threads.
     * @param gid the UNIX gid that the new process should setgid() to after
     * fork()ing and and before spawning any threads.
     * @param gids null-ok; a list of UNIX gids that the new process should
     * setgroups() to after fork and before spawning any threads.
     * @param runtimeFlags bit flags that enable ART features.
     * @param rlimits null-ok an array of rlimit tuples, with the second
     * dimension having a length of 3 and representing
     * (resource, rlim_cur, rlim_max). These are set via the posix
     * setrlimit(2) call.
     * @param permittedCapabilities argument for setcap()
     * @param effectiveCapabilities argument for setcap()
     *
     * @return 0 if this is the child, pid of the child
     * if this is the parent, or -1 on error.
     */
    static int forkSystemServer(int uid, int gid, int[] gids, int runtimeFlags,
            int[][] rlimits, long permittedCapabilities, long effectiveCapabilities) {
        ZygoteHooks.preFork();

        int pid = nativeForkSystemServer(
                uid, gid, gids, runtimeFlags, rlimits,
                permittedCapabilities, effectiveCapabilities);

        // Set the Java Language thread priority to the default value for new apps.
        Thread.currentThread().setPriority(Thread.NORM_PRIORITY);

        ZygoteHooks.postForkCommon();
        return pid;
    }
system_server 进程的最终实现是在 native 层,但是从注释来看,它的返回值如果是 0 则说明当前是子进程,否则可能依然是父进程或者 fork 失败。如果 system_server 进程创建成功,会依次执行到 handleSystemServerProcess 和 zygoteInit 方法,继续跟进到 RuntimeInit.applicationInit 一探究竟:
frameworks/base/core/java/com/android/internal/os/RuntimeInit.java
1
2
3
4
5
6
7
8
9
10
11
12
13
14
15
16
17
18
19
20
21
22
23
24
25
26
27
28
29
30
31
32
33
34
35
36
37
38
39
40
41
42
43
44
45
46
47
48
49
50
51
52
53
54
55
56
57
58
59
60
61
62
63
64
65
66
67
68
69
70
71
72
73
74
75
76
77
78
protected static Runnable applicationInit(int targetSdkVersion, long[] disabledCompatChanges,
            String[] argv, ClassLoader classLoader) {

  			...

        // Remaining arguments are passed to the start class's static main
        return findStaticMain(args.startClass, args.startArgs, classLoader);
    }

protected static Runnable findStaticMain(String className, String[] argv,
            ClassLoader classLoader) {
        Class<?> cl;

        try {
            cl = Class.forName(className, true, classLoader);
        } catch (ClassNotFoundException ex) {
            throw new RuntimeException(
                    "Missing class when invoking static main " + className,
                    ex);
        }

        Method m;
        try {
            m = cl.getMethod("main", new Class[] { String[].class });
        } catch (NoSuchMethodException ex) {
            throw new RuntimeException(
                    "Missing static main on " + className, ex);
        } catch (SecurityException ex) {
            throw new RuntimeException(
                    "Problem getting static main on " + className, ex);
        }

        int modifiers = m.getModifiers();
        if (! (Modifier.isStatic(modifiers) && Modifier.isPublic(modifiers))) {
            throw new RuntimeException(
                    "Main method is not public and static on " + className);
        }

        /*
         * This throw gets caught in ZygoteInit.main(), which responds
         * by invoking the exception's run() method. This arrangement
         * clears up all the stack frames that were required in setting
         * up the process.
         */
        return new MethodAndArgsCaller(m, argv);
    }
/**
     * Helper class which holds a method and arguments and can call them. This is used as part of
     * a trampoline to get rid of the initial process setup stack frames.
     */
    static class MethodAndArgsCaller implements Runnable {
        /** method to call */
        private final Method mMethod;

        /** argument array */
        private final String[] mArgs;

        public MethodAndArgsCaller(Method method, String[] args) {
            mMethod = method;
            mArgs = args;
        }

        public void run() {
            try {
                mMethod.invoke(null, new Object[] { mArgs });
            } catch (IllegalAccessException ex) {
                throw new RuntimeException(ex);
            } catch (InvocationTargetException ex) {
                Throwable cause = ex.getCause();
                if (cause instanceof RuntimeException) {
                    throw (RuntimeException) cause;
                } else if (cause instanceof Error) {
                    throw (Error) cause;
                }
                throw new RuntimeException(ex);
            }
        }
    }
最终不出我们所料,findStaticMain 中传递的 className 对应的就是我们之前的 com.android.server.SystemServer 类,我们来看看它里面都做了些什么(SystemServer#main 会执行到 run 方法):
frameworks/base/services/java/com/android/server/SystemServer.java
1
2
3
4
5
6
7
8
9
10
11
12
13
14
15
16
17
18
19
20
21
22
23
24
25
26
27
28
29
30
31
32
33
34
35
36
37
38
39
40
41
42
43
44
45
46
47
48
49
50
51
52
53
54
55
56
private void run() {
        try {
            ...

            // Prepare the main looper thread (this thread).
            android.os.Process.setThreadPriority(
                    android.os.Process.THREAD_PRIORITY_FOREGROUND);
            android.os.Process.setCanSelfBackground(false);
            Looper.prepareMainLooper();
            Looper.getMainLooper().setSlowLogThresholdMs(
                    SLOW_DISPATCH_THRESHOLD_MS, SLOW_DELIVERY_THRESHOLD_MS);

            SystemServiceRegistry.sEnableServiceNotFoundWtf = true;
						...

            // Initialize the system context.
            createSystemContext();

						...
            // Create the system service manager.
            mSystemServiceManager = new SystemServiceManager(mSystemContext);
            mSystemServiceManager.setStartInfo(mRuntimeRestart,
                    mRuntimeStartElapsedTime, mRuntimeStartUptime);
            mDumper.addDumpable(mSystemServiceManager);

            LocalServices.addService(SystemServiceManager.class, mSystemServiceManager);
            // Prepare the thread pool for init tasks that can be parallelized
            SystemServerInitThreadPool tp = SystemServerInitThreadPool.start();
            mDumper.addDumpable(tp);
          	...
        } finally {
            t.traceEnd();  // InitBeforeStartServices
        }

        // Setup the default WTF handler
        RuntimeInit.setDefaultApplicationWtfHandler(SystemServer::handleEarlySystemWtf);

        // Start services.
        try {
            t.traceBegin("StartServices");
            startBootstrapServices(t);
            startCoreServices(t);
            startOtherServices(t);
            startApexServices(t);
        } catch (Throwable ex) {
            Slog.e("System", "******************************************");
            Slog.e("System", "************ Failure starting system services", ex);
            throw ex;
        } finally {
            t.traceEnd(); // StartServices
        }
				...
        // Loop forever.
        Looper.loop();
        throw new RuntimeException("Main thread loop unexpectedly exited");
    }
通过分析上面代码可以发现 system_server 为我们做了很多事情:
- 创建系统服务管理器 SystemServiceManager
- 启动引导服务(AMS、PMS等)、核心服务和其他各种服务
- 创建主线程 Looper 并一直循环,等待其他线程通过 Handler 发送消息再唤醒并处理。
nativeZygoteInit
上面的 com.android.internal.os.ZygoteInit#forkSystemServer 中 ZygoteInit.nativeZygoteInit() 方法主要从 native 层创建了进程的 Binder 线程池。值得注意的,这一切发生在 system_server 进程创建之后。最终可以追溯到:
frameworks/native/libs/binder/ProcessState.cpp
1
2
3
4
5
6
7
8
9
10
11
12
void ProcessState::spawnPooledThread(bool isMain)
{
    if (mThreadPoolStarted) {
        String8 name = makeBinderThreadName();
        ALOGV("Spawning new pooled thread, name=%s\n", name.string());
        sp<Thread> t = sp<PoolThread>::make(isMain);
        t->run(name.string());
        pthread_mutex_lock(&mThreadCountLock);
        mKernelStartedThreads++;
        pthread_mutex_unlock(&mThreadCountLock);
    }
}
系统启动日志分析
从 Android 开机开始到我们系统初始化完毕,这中间设有大量的关键日志,如果能够好好利用,对于我们排查一些系统性问题或者性能问题会有巨大帮助。以下列举部分关键节点的 Tag:
可查看启动耗时
- boot_progress_start:表示 kernel 启动完成,第一个用户空间进程 init 进程启动
- boot_progress_preload_start:zygote 进程开始预加载 class 资源(记录于 ZygoteInit#preload 调用时机)
- boot_progress_preload_end:zygote 进程 class 资源预加载结束
- boot_progress_system_run:表示 system_server 进程启动(记录于 SystemServer#run 调用时机)
- boot_progress_pms_start:表示 PMS 服务启动并开始扫描应用的动作
- boot_progress_pms_ready:表示 PMS 服务应用扫描完毕
- boot_progress_ams_ready:表示 AMS 已经进入 systemReady 状态可以启动桌面应用了
- boot_progress_enable_screen:标志着锁频界面已经点亮显示,开机完成并统计耗时
更多 native 层相关统计的 tag 参照:system/logging/logcat/event.logtags
我们可以额外留意一些系统进程和服务的相关日志,比如 zygote 运行相关日志:
1
2
3
4
5
6
7
8
9
10
11
12
13
14
15
16
17
18
19
20
21
22
23
// Zygote64进程(Zygote):  AndroidRuntime::start
11-23 14:36:51.260   557   557 D AndroidRuntime: >>>>>> START com.android.internal.os.ZygoteInit uid 0 <<<<<<
// Zygote64进程:  AndroidRuntime::startVm
11-23 14:36:51.304   557   557 D AndroidRuntime: CheckJNI is OFF

// 执行ZygoteInit.preload()
11-23 14:36:52.134   557   557 D Zygote  : begin preload
// 执行ZygoteInit.preloadClasses(), 预加载3860个classes, 花费时长746ms
11-23 14:36:52.134   557   557 I Zygote  : Preloading classes...
11-23 14:36:52.881   557   557 I Zygote  : ...preloaded 3860 classes in 746ms.

// 执行ZygoteInit.preloadClasses(), 预加载86组资源, 花费时长179ms
11-23 14:36:53.114   557   557 I Zygote  : Preloading resources...
11-23 14:36:53.293   557   557 I Zygote  : ...preloaded 86 resources in 179ms.

// 执行ZygoteInit.preloadSharedLibraries()
11-23 14:36:53.494   557   557 I Zygote  : Preloading shared libraries...
11-23 14:36:53.503   557   557 D Zygote  : end preload

// 执行com_android_internal_os_Zygote_nativeForkSystemServer(),成功fork出system_server进程
11-23 14:36:53.544   557   557 I Zygote  : System server process 1274 has been created
// Zygote开始进入runSelectLoop()
11-23 14:36:53.546   557   557 I Zygote  : Accepting command socket connections
system_server 进程运行相关日志:
1
2
3
4
5
6
7
8
9
10
11
12
13
14
15
16
17
18
19
20
21
22
23
24
25
26
27
28
29
30
31
32
33
34
35
36
37
38
//进入system_server, 建立跟Zygote进程的socket通道
11-23 14:36:53.586  1274  1274 I Zygote  : Process: zygote socket opened, supported ABIS: armeabi-v7a,armeabi
// 执行SystemServer.run()
11-23 14:36:53.618  1274  1274 I SystemServer: Entered the Android system server!   <===> boot_progress_system_run
// 等待installd准备就绪
11-23 14:36:53.707  1274  1274 I Installer: Waiting for installd to be ready.

//服务启动
11-23 14:36:53.732  1274  1274 I ActivityManager: Memory class: 192

//phase100
11-23 14:36:53.883  1274  1274 I SystemServiceManager: Starting phase 100
11-23 14:36:53.902  1274  1274 I SystemServer: Package Manager
11-23 14:37:03.816  1274  1274 I SystemServer: User Service
...
11-23 14:37:03.940  1274  1274 I SystemServer: Init Watchdog
11-23 14:37:03.941  1274  1274 I SystemServer: Input Manager
11-23 14:37:03.946  1274  1274 I SystemServer: Window Manager
...
11-23 14:37:04.081  1274  1274 I SystemServiceManager: Starting com.android.server.MountService$Lifecycle
11-23 14:37:04.088  1274  2717 D MountService: Thinking about reset, mSystemReady=false, mDaemonConnected=true
11-23 14:37:04.088  1274  1274 I SystemServiceManager: Starting com.android.server.UiModeManagerService
11-23 14:37:04.520  1274  1274 I SystemServer: NetworkTimeUpdateService

//phase480 && 500
11-23 14:37:05.056  1274  1274 I SystemServiceManager: Starting phase 480
11-23 14:37:05.061  1274  1274 I SystemServiceManager: Starting phase 500
11-23 14:37:05.231  1274  1274 I ActivityManager: System now ready  <==> boot_progress_ams_ready
11-23 14:37:05.234  1274  1274 I SystemServer: Making services ready
11-23 14:37:05.243  1274  1274 I SystemServer: WebViewFactory preparation

//phase550
11-23 14:37:05.234  1274  1274 I SystemServiceManager: Starting phase 550
11-23 14:37:05.237  1274  1288 I ActivityManager: Force stopping com.android.providers.media appid=10010 user=-1: vold reset

//Phase600
11-23 14:37:06.066  1274  1274 I SystemServiceManager: Starting phase 600
11-23 14:37:06.236  1274  1274 D MountService: onStartUser 0
基于记录以上关键日志的目的,我们可以通过以下 logcat 命令在手机开机后使用:
adb logcat -b events |grep “boot_progress”adb logcat -s Zygote|SystemServer|SystemServiceManager|ActivityManager
总结
笔者认为,源码分析过程中如果能输出关键类调用的流程,能够显著加强后续理解。关于普通应用进程的创建和启动过程将在后续 Activity 启动分析中一并介绍。下图就是关于本文各进程启动过程的方法调用链路总结。

参考
- AOSP 架构概览
- Android 系统启动综述
- https://juejin.cn/post/6999491633129455653
许可协议: 署名-非商业性使用-禁止演绎 4.0 国际 转载请保留原文链接及作者。